No two plans will always look alike. Learn how to adjust segment count, length, and name. Enter notes describing key attributes of each segment’s timing.
Adjusting Segment Lengths
To easily modify when one segment ends and the next begins, you can click and drag the segment dividers on any of the charts, such as the Cash Flow Chart or Assets Chart. Just hover over a segment divider to highlight it, then click and drag to move the divider between years. The plan will update immediately upon releasing the mouse button.
If you drag a segment divider past another divider, or outside of the plan length, it will revert to the first or final valid year.
Segments Tab
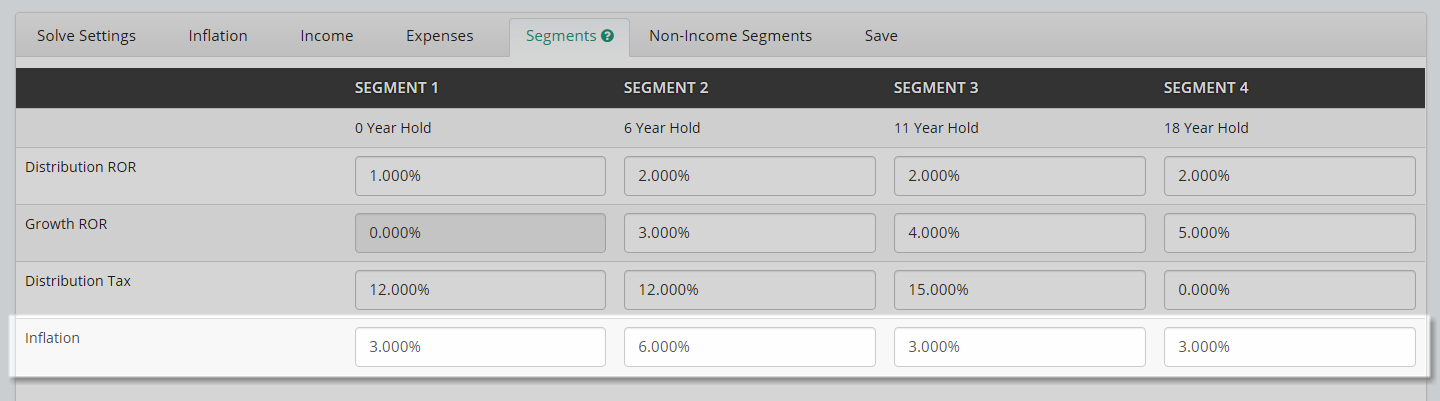
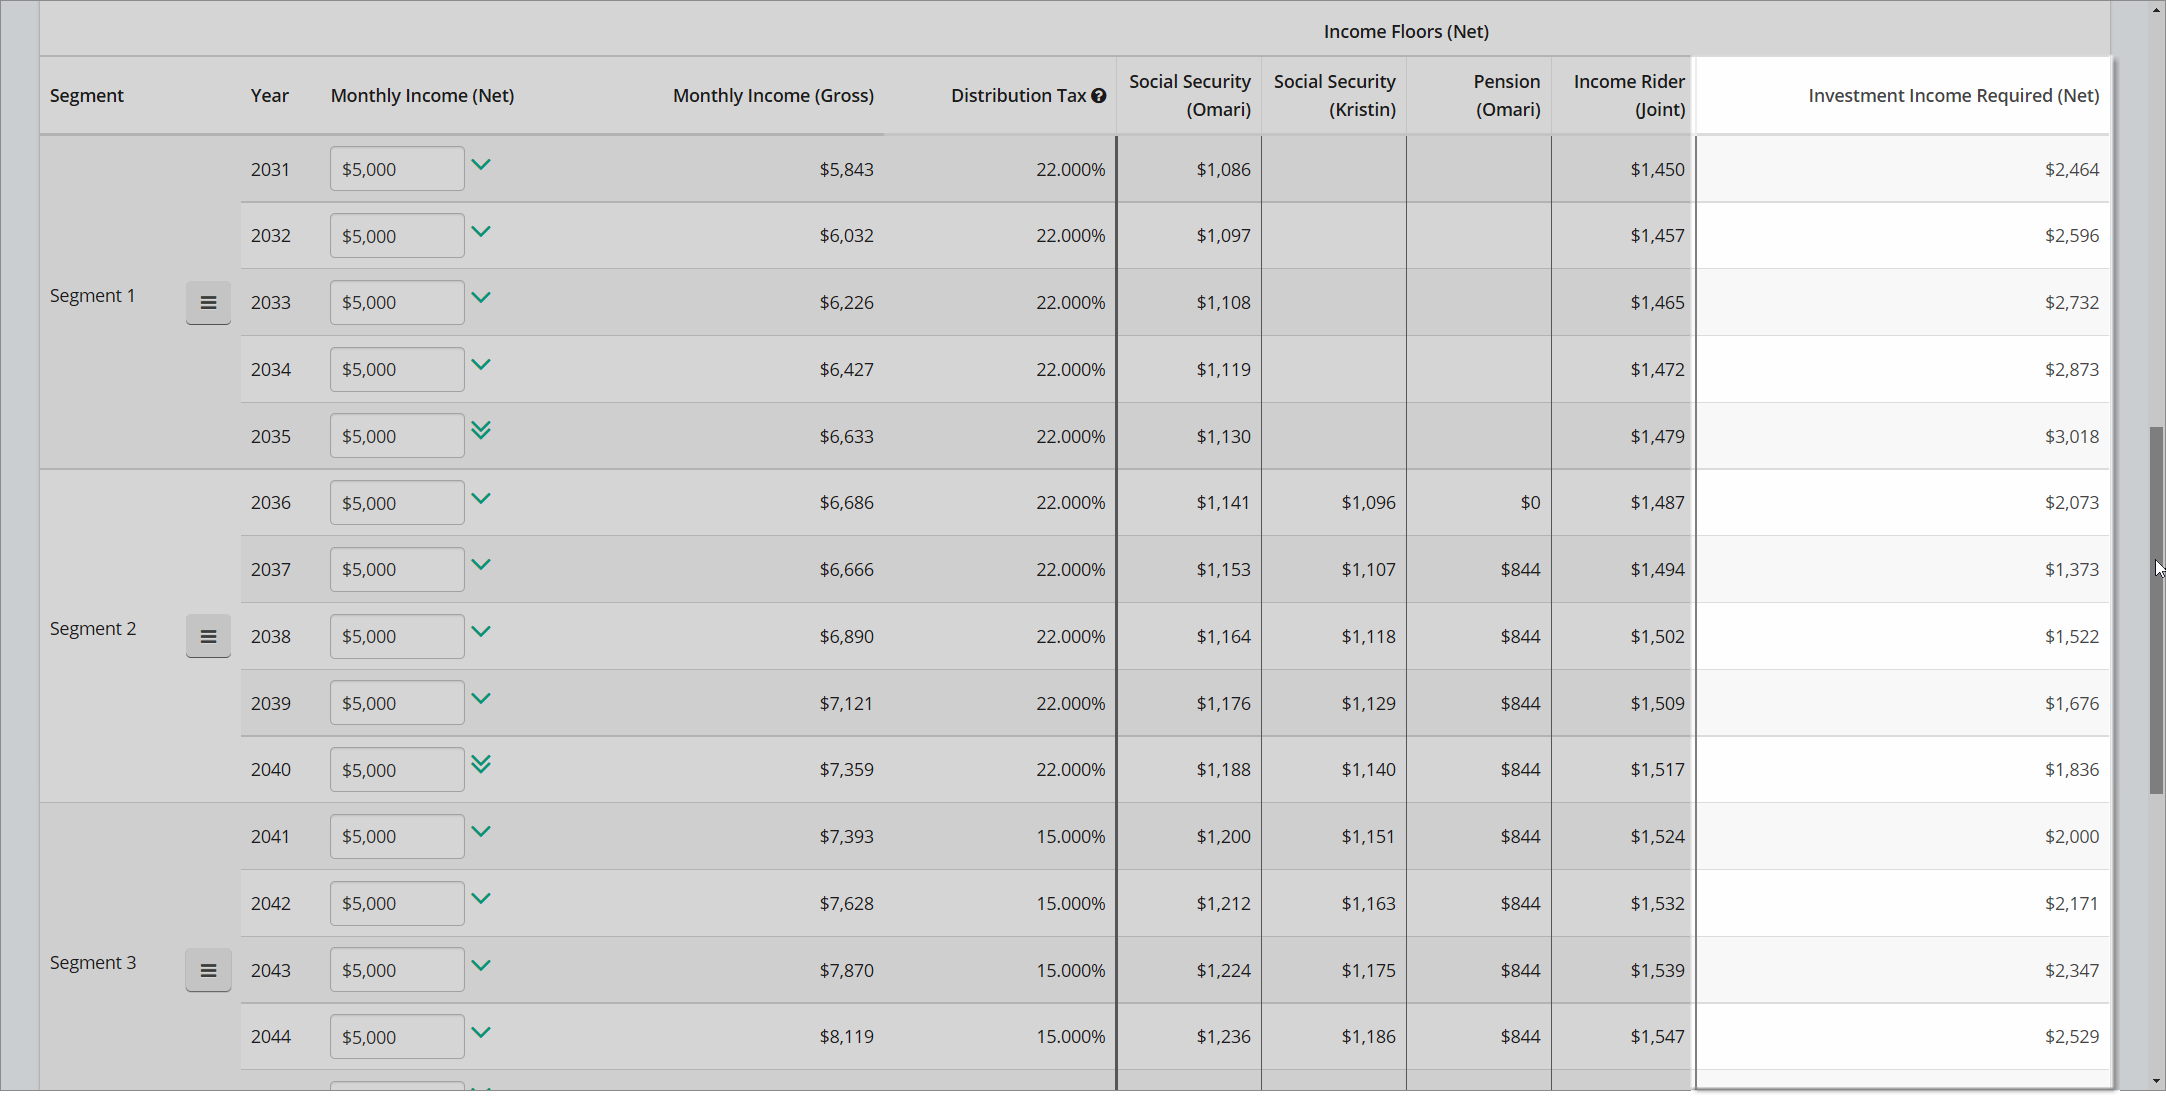
At the top of the first table, each segment name is displayed. By default, the segments are simply named Segment 1, Segment 2, and so on.
The next row displays how many years each segment will be invested during it’s “growth” period prior to its distribution period. Because Segment 1 will be used for income distribution immediately, the holding period is always 0 years. The later segments’ holding periods will vary depending on the length of the previous segments.
The holding period of a segment is an important consideration when determining which investment strategy may best fit this segment’s requirements. You can think of the holding period as the corresponding portfolio’s investment time horizon.
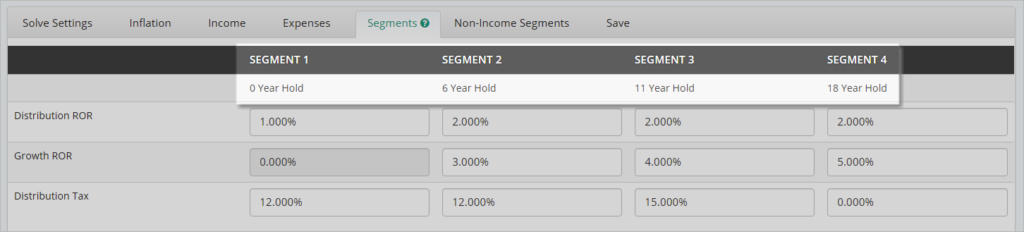
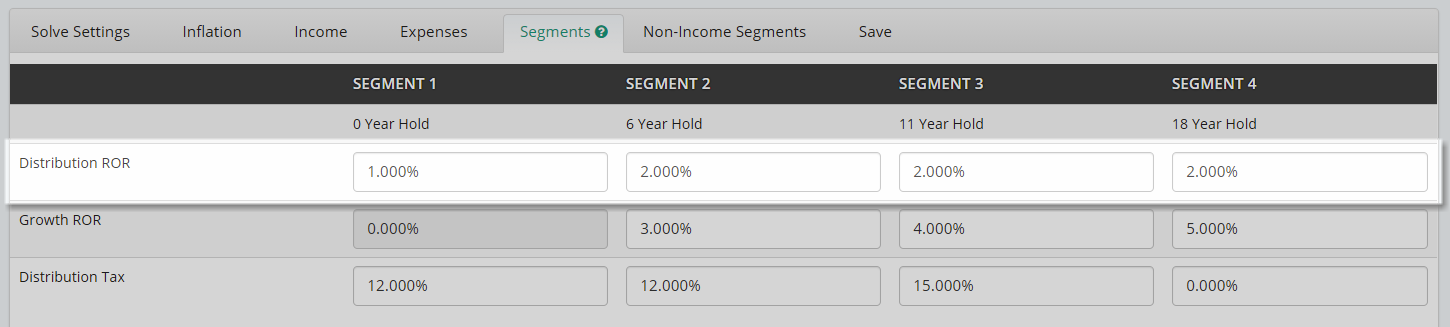
Distribution Rate of Return (ROR)
This value represents the assumed Rate of Return that the segment is targeted to generate while it is being distributed. For example, if a segment has a holding period of 10 years and a length of 5 years, it is targeted to grow years 1-10 then distribute income over years 11-15. The Distribution ROR will be applied to this segment’s assets during years 11-15.
The time segmentation strategy calls for segments to be placed in vehicles with little to no market risk during their distribution periods to decrease or remove volatility in the amount of income generated. Thus, the distribution ROR is often assumed to be very conservative.
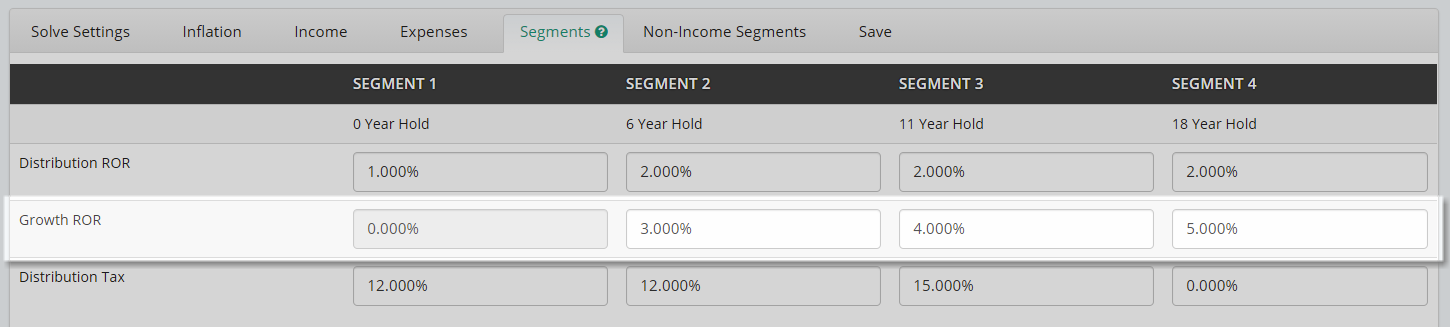
Growth Rate of Return (ROR)
The next row allows you to assign a Growth Rate of Return to the investment assets of each segment. This value represents the assumed Rate of Return that the segment is targeted to generate during its holding period, shown above, prior to distribution. Like the distribution ROR, modifying a segment’s growth ROR will change it’s required starting balance.
For example, if a segment has a holding period of 10 years and a length of 5 years, it is targeted to grow years 1-10 then distribute income over years 11-15. The Growth ROR will be applied to this segment’s assets during years 1-10. Segment 1 does not have a growth period, so no growth ROR can assigned.
Because the time segmentation strategy is designed to provide inflation adjusted income, the Growth ROR assigned will often increase as the holding period of the segment increases. This reflects the use of higher-equity exposure investments for longer time horizons.
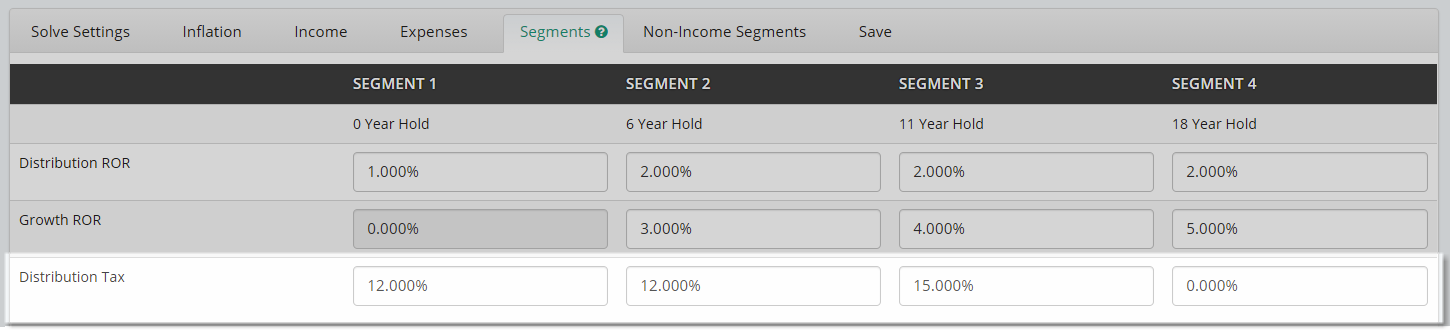
Distribution Tax
The next row allows you to assign a Distribution Tax to the investment assets of each segment. The assumed tax rate entered here will increase the gross, or pre-tax income required to generate the net, or after-tax income goal. For example, if the net monthly income need in a segment is $1000 and the assumed distribution tax for the segment is set to 20%, the gross monthly income need will be $1,250.
Because a different assumed distribution tax rate can be assigned to each segment, you can model different asset liquidation orders.
For example, if a client had a mix of qualified, non-qualified and ROTH registrations, you may wish to use the qualified assets first, non-qualified assets with long term capital gains second, and the ROTH assets last.
Using the qualified first could allow the client to take advantage a near-term low income tax environment and avoid RMD problems down the line. Upon death, both the Long Term Capital Gains accounts and ROTH account would pass income tax free to the beneficiaries.
There are several variables that could affect the liquidation order, such as:
- Will the client likely be in a higher or lower tax bracket in the future?
- Does the client have a desire to leave a tax-free legacy?
- Will the future RMDs require more income than the client needs causing the extra income to potentially be taxed at a higher marginal rate?
Using the Distribution Tax fields thoughtfully allows you to easily model a variety of tax liquidation orders in a quick and clear fashion that will be easy for your client to understand.
Inflation
There is a final row than can appear in this section that allows you to input an inflation assumption for each segment. To view this row, you need to have Segment-Level Inflation selected under the Inflation tab.
The inflation assumption entered will determine at what rate the net income goal for each year in the segment will increase when inflation option is set to “Inflate income need every year.”
If the inflation option is set to “inflate income need when a new segment starts”, the inflation assigned to a segment will be reflected at the beginning of the next segment. As a result, the inflation assigned to the final segment in the plan will not be applied to any plan years.
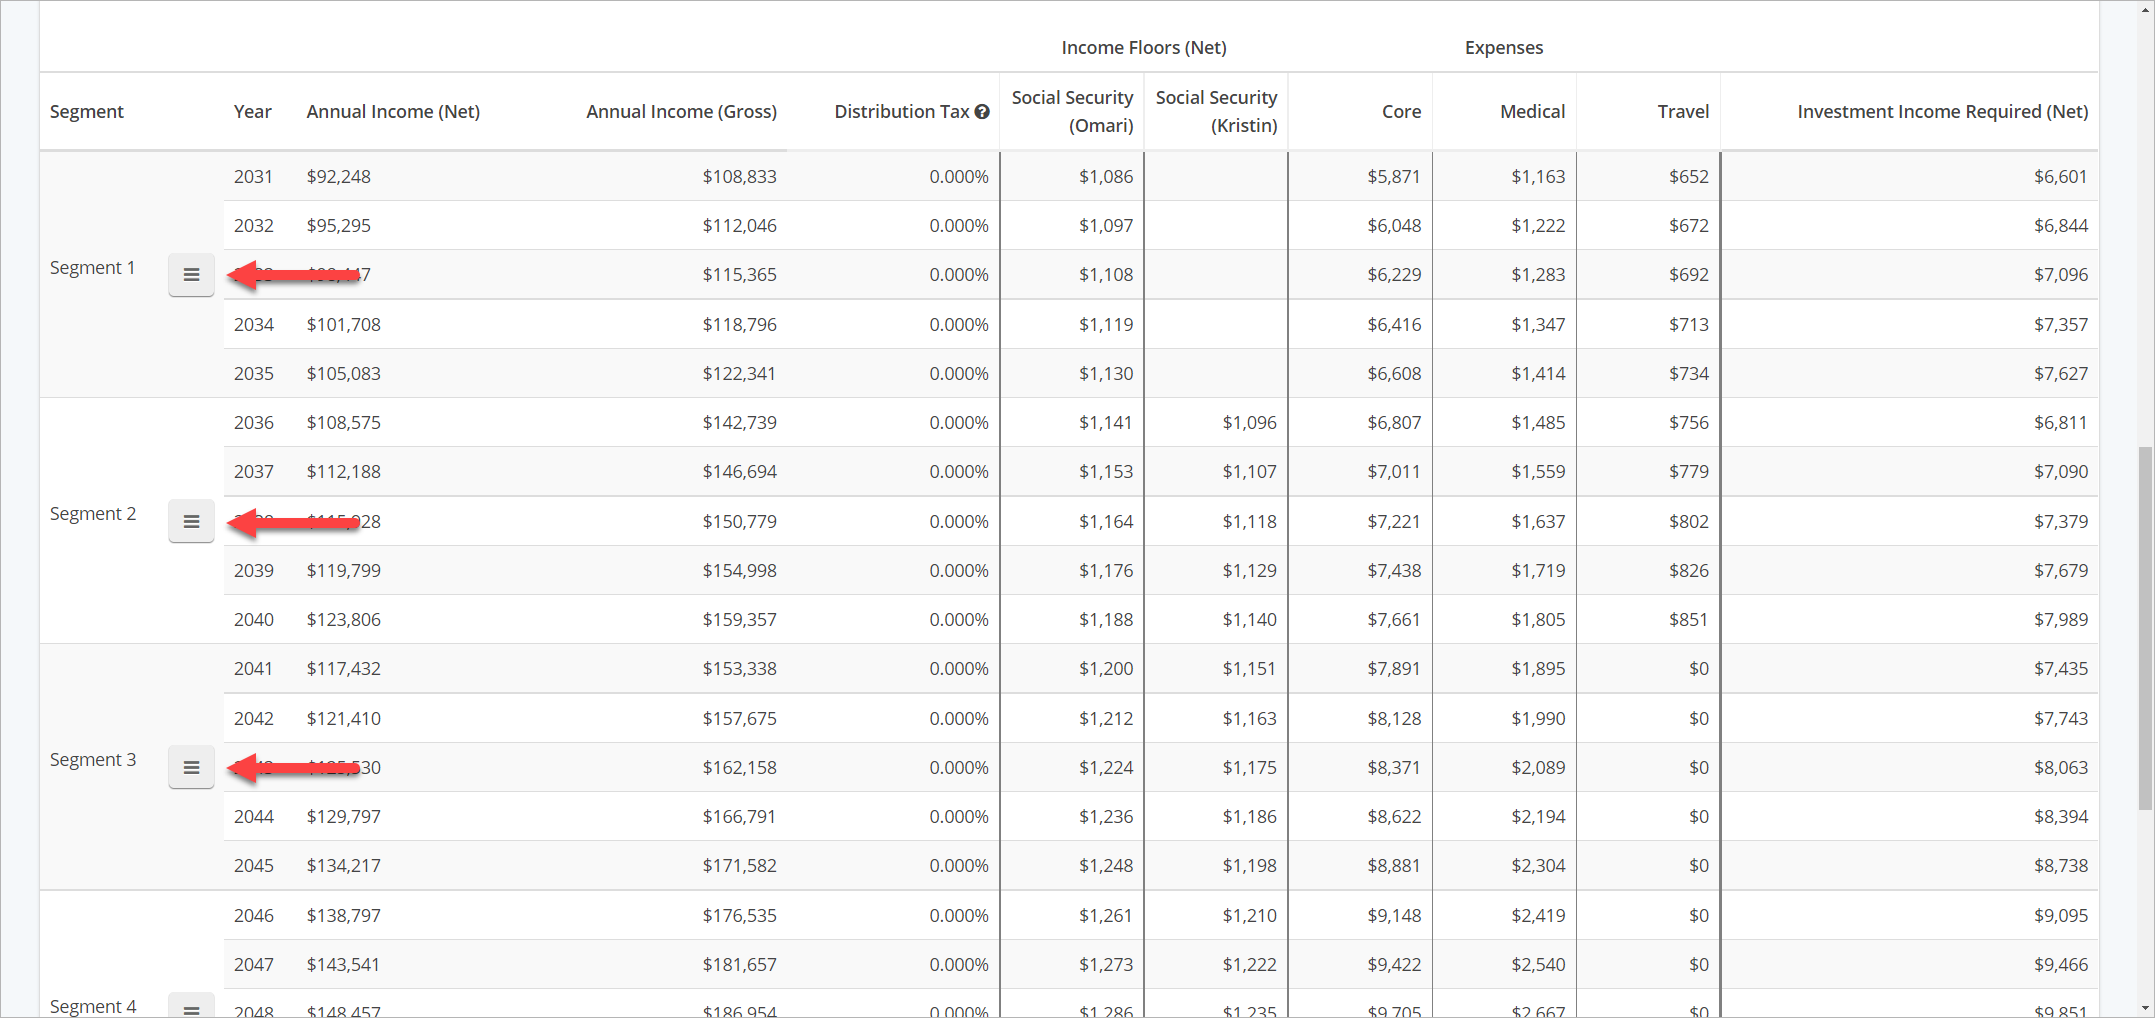
Segment Options
Under these rows is a table that displays income year by year and allows segment name and length to be modified. In the left-most column, segment names are displayed. There is also a control button.
When clicked, you will receive options to Rename the segment, add Notes to the segment, Merge Down into the next segment or open the Split Tool to break a segment into smaller pieces.
Rename
You can custom name the segments to correspond to phases of retirement, products or strategies that be used to fund them, or any other identifier that helps add clarity for the client. The custom name of the segment will appear throughout the system and on all reports.
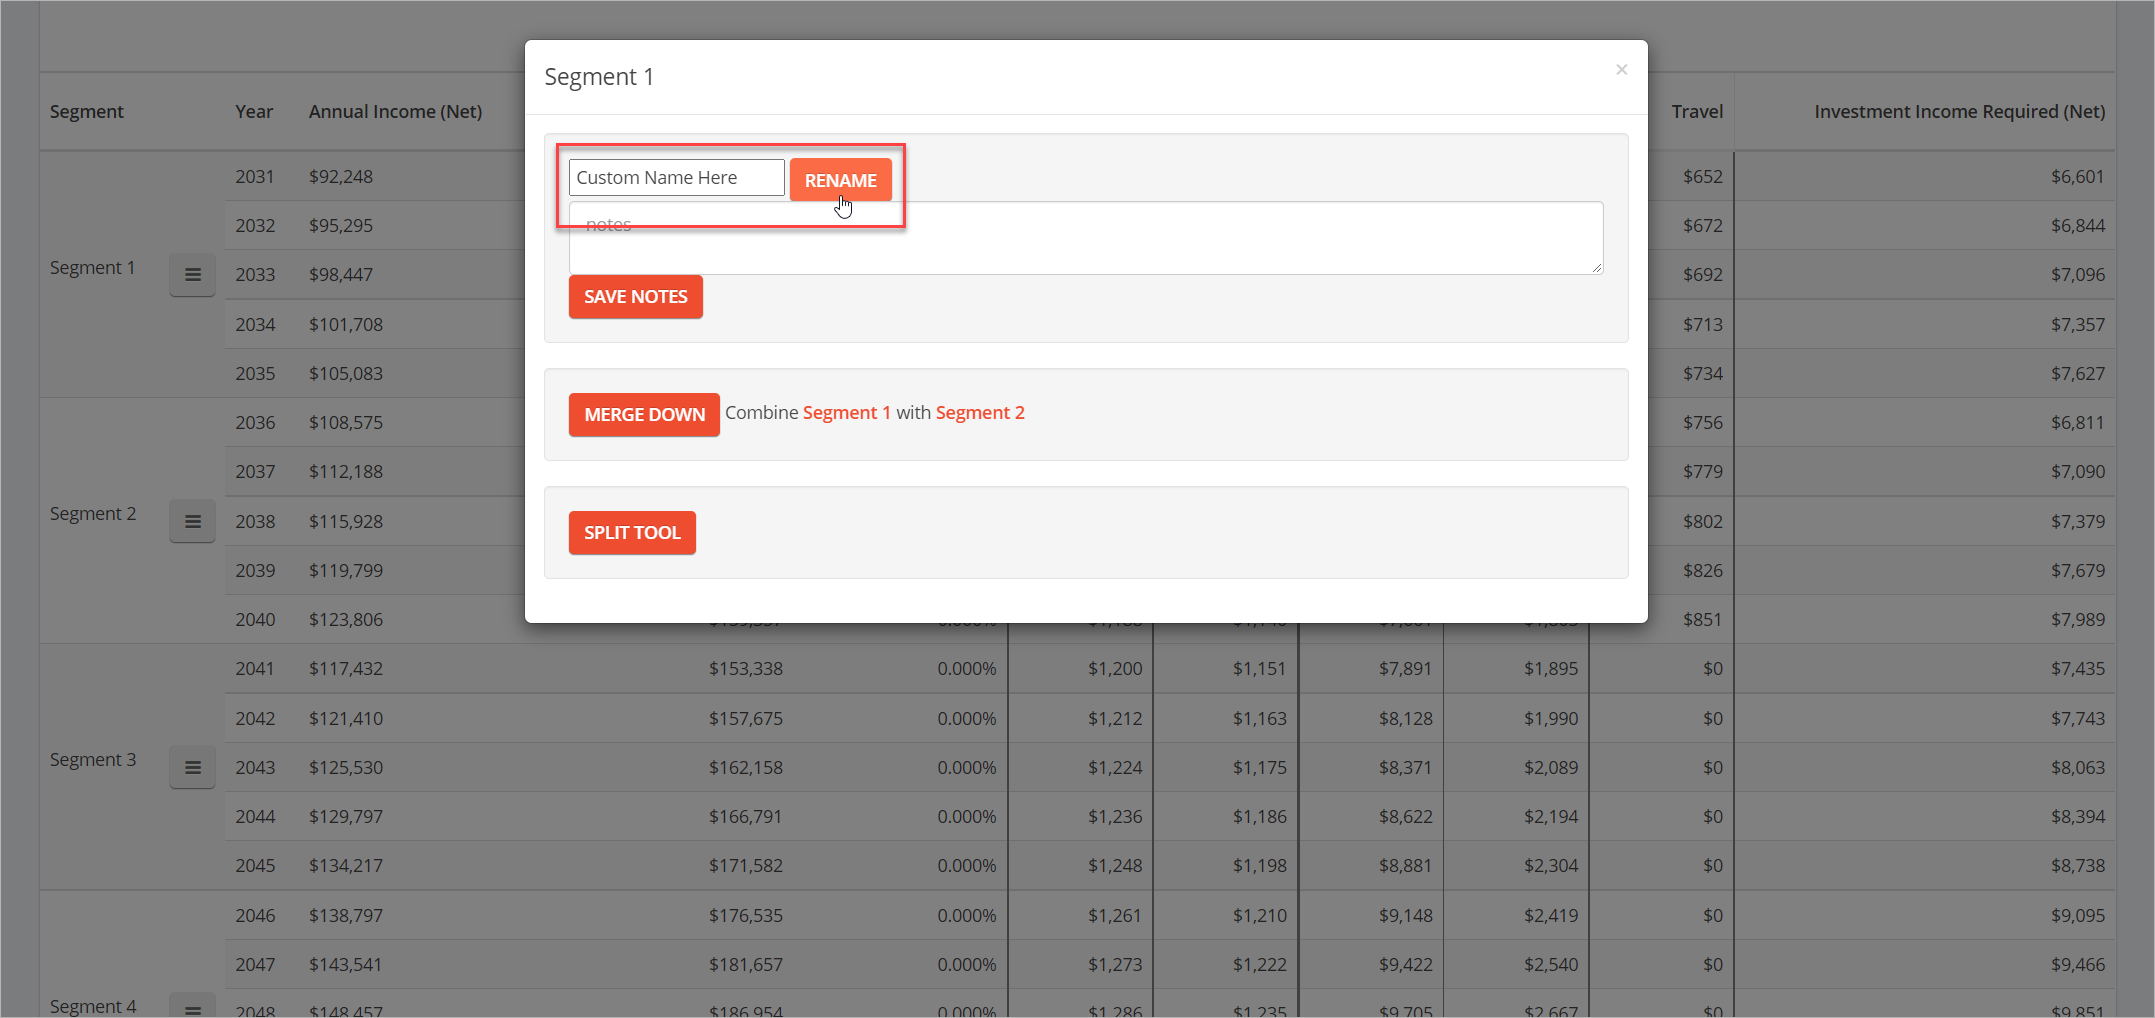
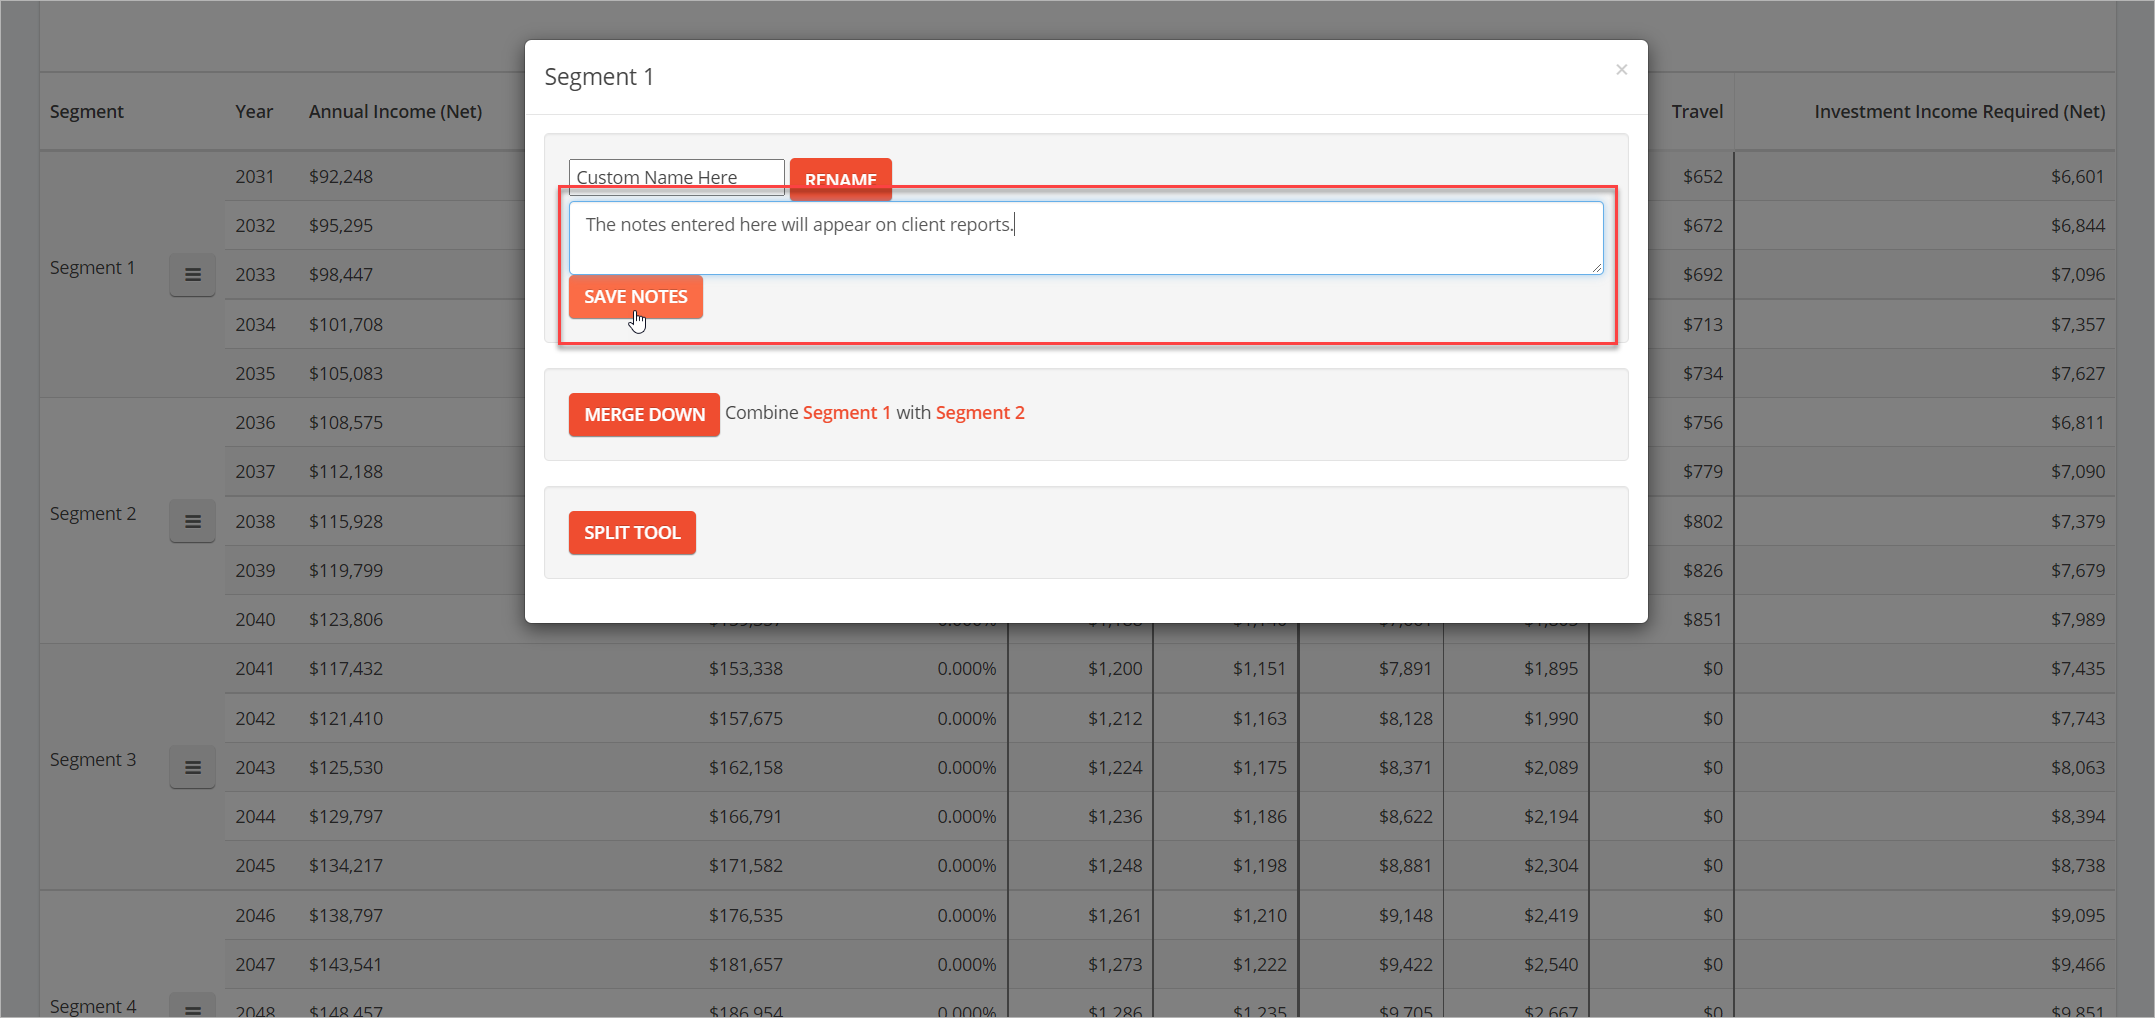
Notes
Adding notes to a segment can be used to provide additional clarity on decisions made around the segment’s assumptions, timing, length, etc.
Merge Down
You can combine two segments into one larger segment by clicking the options button and choosing Merge Down. The custom name, segment notes, ROR, and tax inputs of the first segment will be retained.
Split Tool
To break a segment into two smaller segments, select the options button and choose Split Tool. You will see a yellow highlight when hovering the mouse over a year. Clicking on a year will create a split at the end of that year. The custom name, notes, ROR, and tax assumptions from the original segment will be applied to the first of the two new segments.
Specifying Income by Year
The net income goal for each year is also displayed in this column. If you are not using the Investment Goal solve type under the Solve Settings tab, and are not using Expense-Level Inflation under the inflation tab, these values will be editable.
If you have an existing cashflow projection with annual requirements, you can simply enter the income goal for each year and then decide what your segment structure may be.
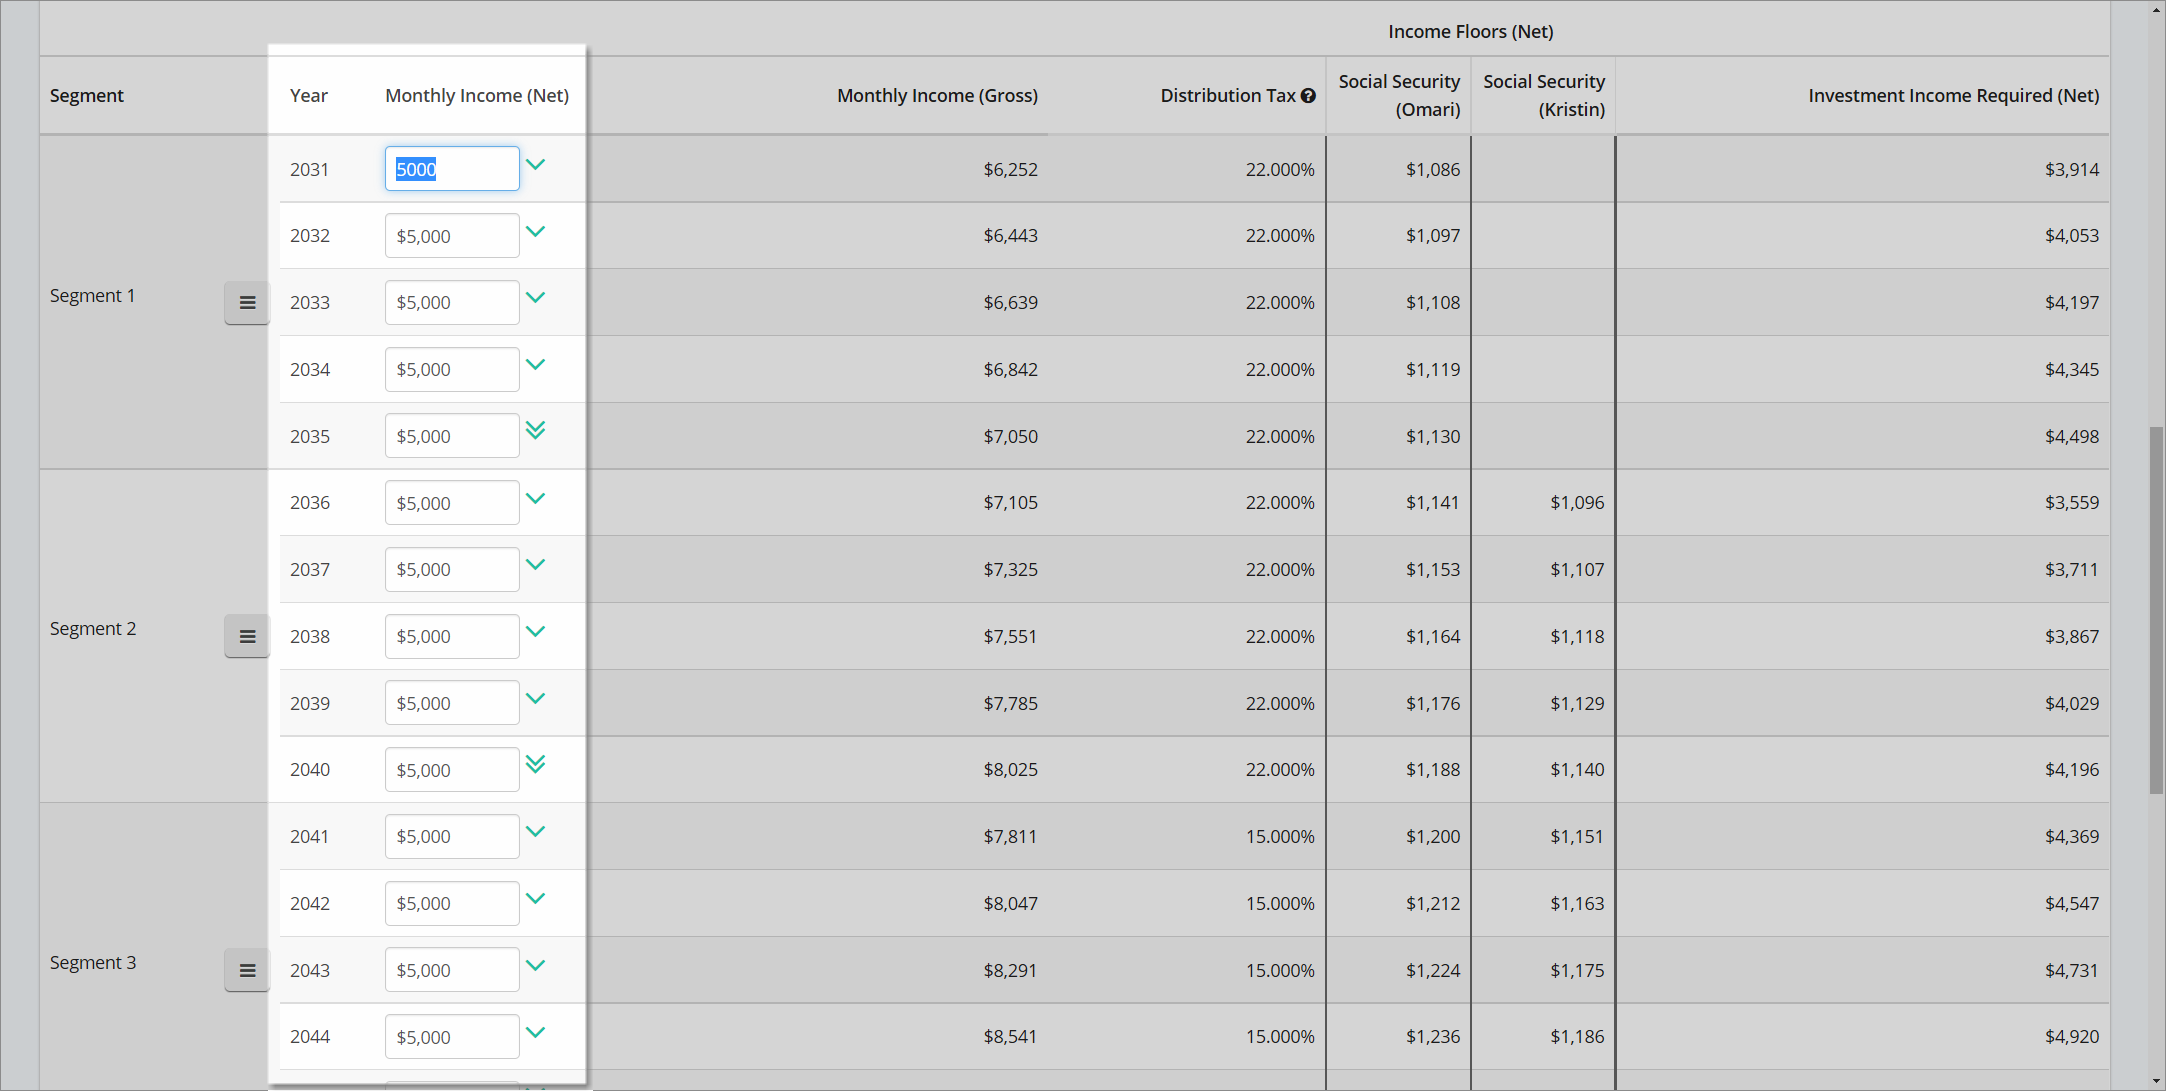
The system will automatically apply inflation to these figures to arrive at the final net income goal for each year. If you change the value in one year, you can extend the change through the rest of the segment by selecting the single arrow icon. To extend that segment’s income goal through the rest of the plan, select the double arrow icon next to the income goal for the final year of the segment.
If you are using the Investment Goal solve type, or Expense-level inflation, this column will display the net income goal after inflation and will not be editable.
Income Details
The next column displays gross monthly income by year, including inflation adjustment. The gross income figure incorporates the assumed tax rates assigned to income floors as well as the distribution tax assigned to each segment’s investment assets. The Distribution Tax rate assigned to the segment is displayed in the next column.
If you are using income floors, the next set of columns will display the monthly net income generated by each income floor during the year’s in which it is available.
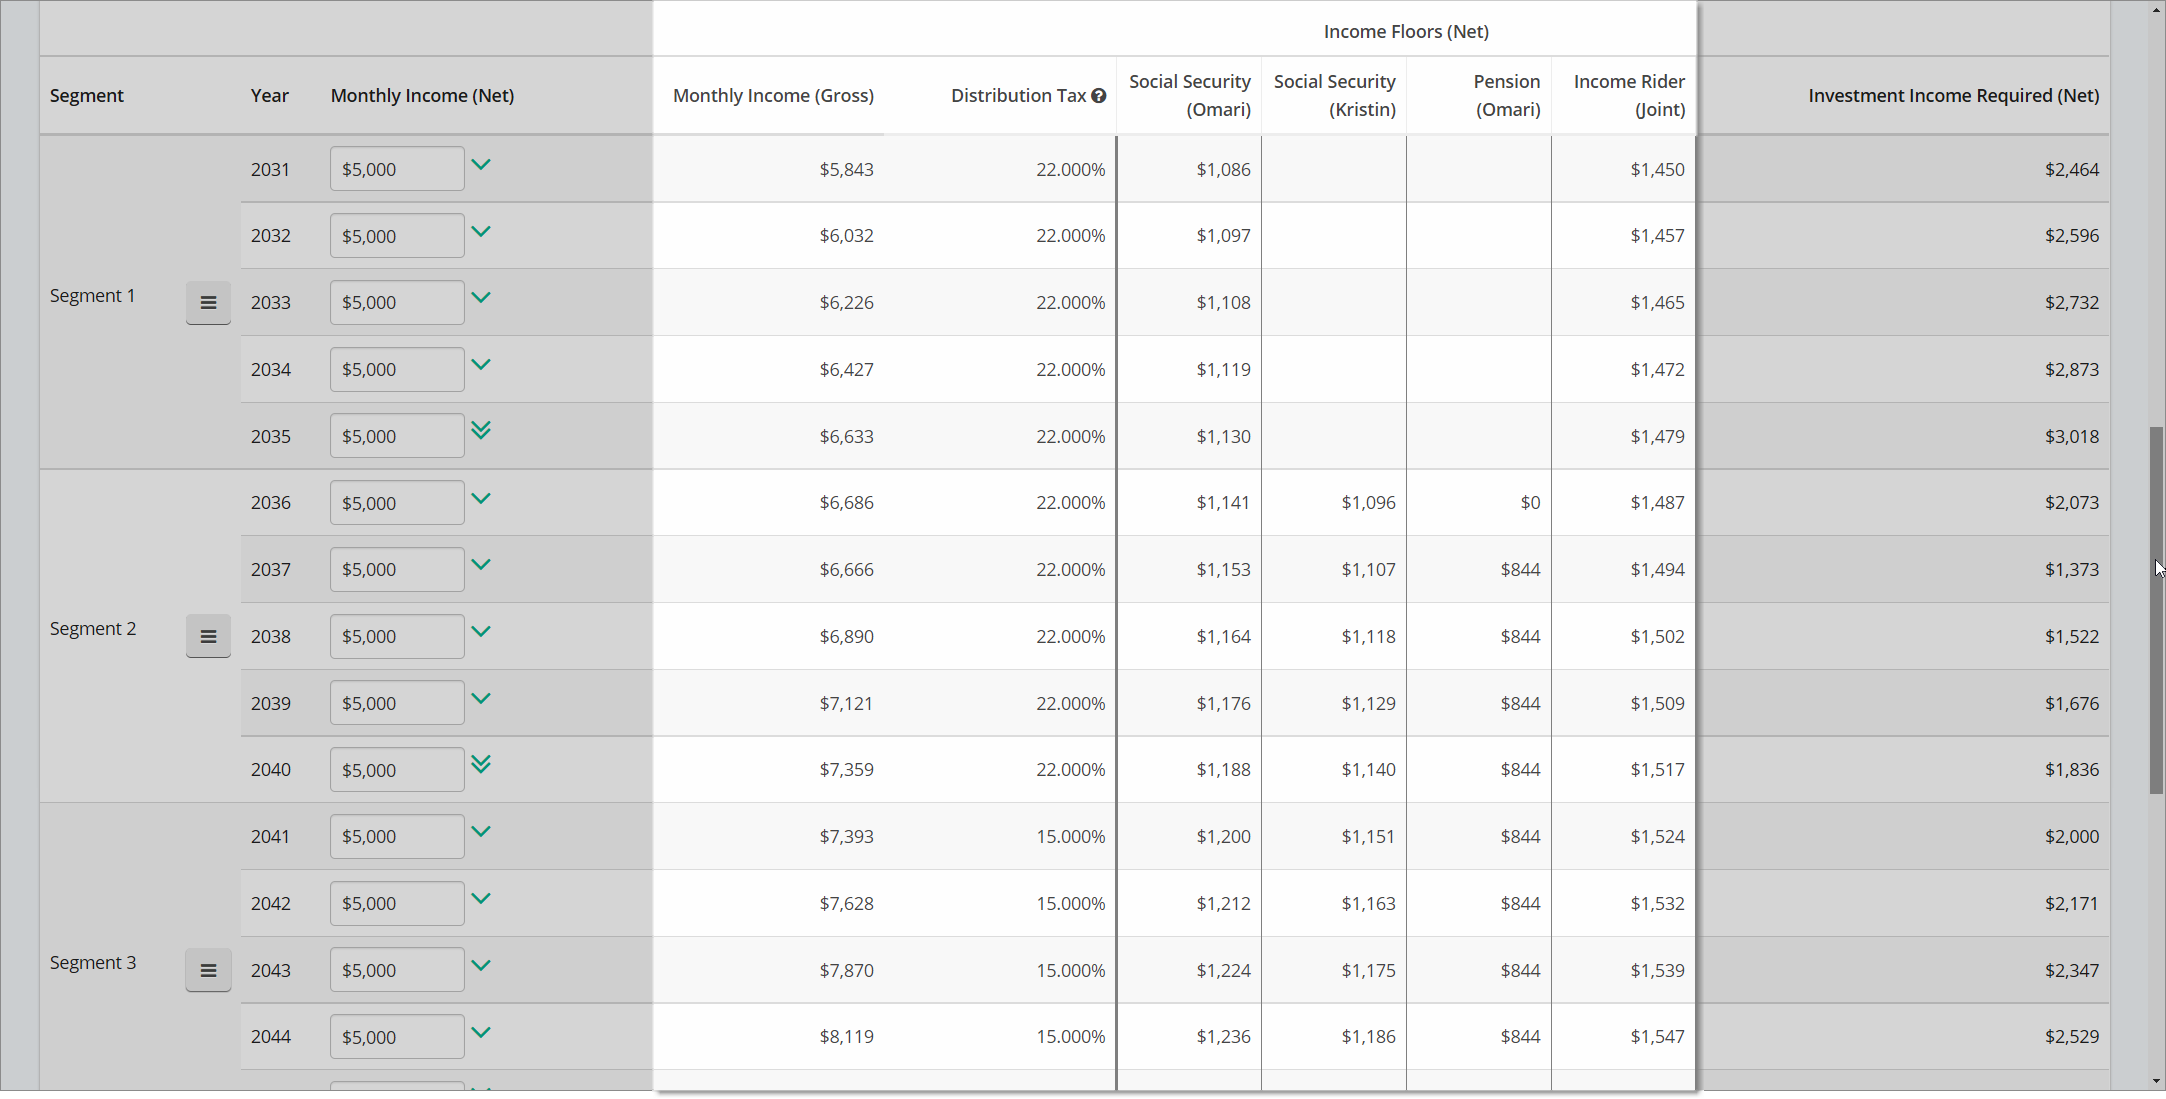
The final column in the table shows the total net monthly income required from invested assets for each year of the plan. This figure is calculated as the difference between the total net income need and the total net income generated from all income floors. If the available income floor income is greater than the income need for the year, the investment income required will be $0.
Expense Details
If you are using expense-level inflation, the next set of columns will display the monthly value of each expense during the years which it is incurred.
